What Goes Into a Building Permit Application?
Thu, Mar 15, 2018Let’s talk about what goes into a building permit application. Prior to this project, I would have said it was an application form and the architectural plans. In reality, it’s much more detailed (and the exact requirements will vary by county).
Architectural Plans
Architectural plans specify what the building will look like. How rooms connect, etc. When you’re designing these plans, you get to be creative and incorporate all the various ideas you’ve been dreaming about.
The architectural plans will contain a number of sheets. The first sheet is typically the site plan. This sheet shows the property boundary, location of the building site, setbacks from property lines, and all other important details about the site (slopes, bodies of water, etc).
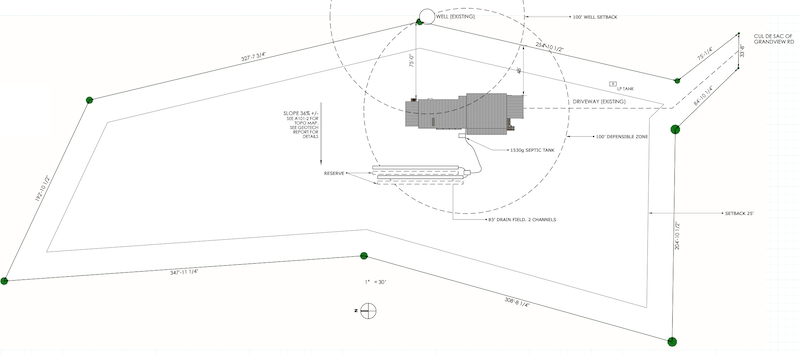 Our Site Plan
The next couple sheets are elevations. These show what the house looks like from each side, and how the house sits with the final grade of the site. These sheets will be important for us since we are combating a steep hill, and the county will be interested in how it sits on the slope.
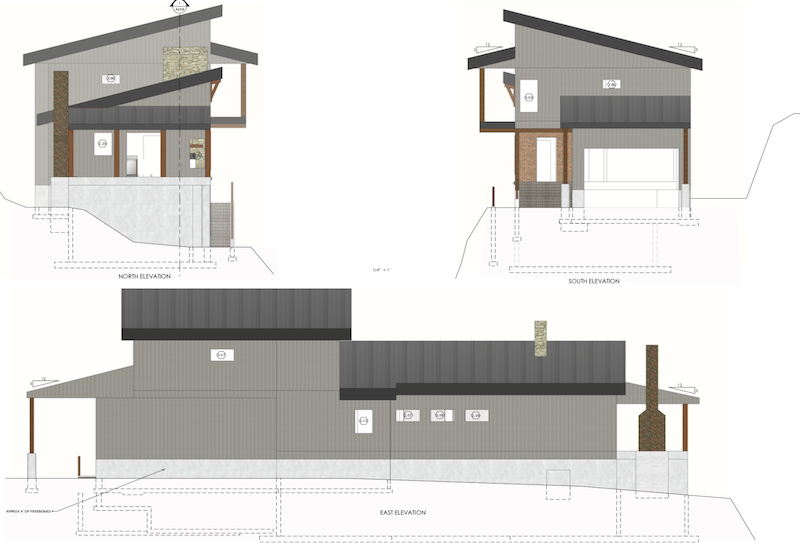 Example elevation sheet
Next up are the floor plans. This is a top down view of each floor, showing how the interior is laid out. These sheets are where you see most of the dimensions. An interesting thing about dimensions is that architects and designers will not specify every dimension needed. For example, if you have two rooms side by side, the length of one room will be specified, and the total length of both will be specified. The dimension of the second bedroom will be whatever is left over from the first. This allows for a bit of flexibility when on site since materials can be slightly thinner/thicker than the designer originally modeled.
Finally, the architect or designer will show any number of section views. These are vertical slices through the building, showing parts you couldn’t see from the elevations or floor plans. These are always very purposeful and will be accompanied by lots of annotations. These are also a good time to show the vertical height of rooms.
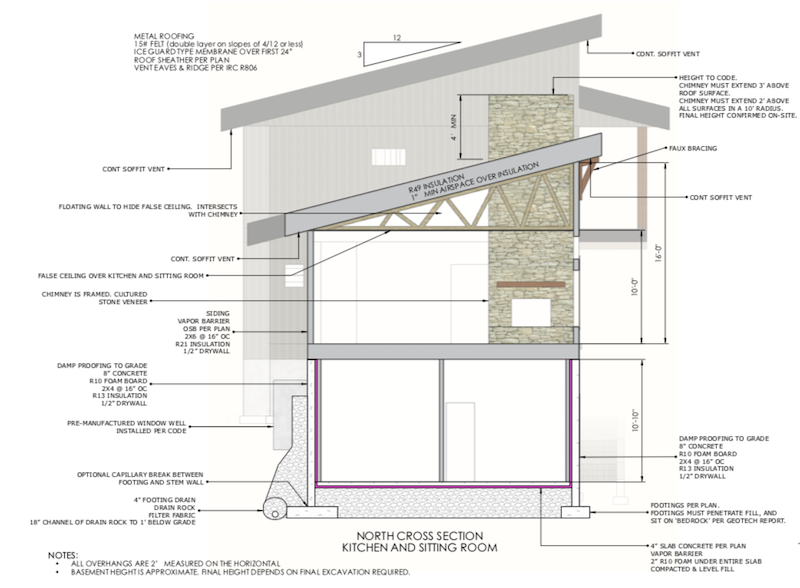 Example section view
The architect is responsible for specifying materials and insulation, so these will be noted on the plans as well. Critical fixtures such as HVAC, toilets, sinks, etc will also be specified.
Various architectural details will be included in call outs throughout the plans. For example, ours include details for constructing a masonry fireplace, and typical stair construction details, among others.
Structural Plans
The structural plans compliment the architectural plans. They will tell a builder how to build the house. They specify structural things like how thick your floor joists should be (and spacing), size and location of headers and other beams, size of your footings, thickness of your concrete stem walls, rebar size and placement, and everything else that will be required to carry any weight in the building. There are so many! When you look at structural plans for the first time, they can be quite overwhelming.
The structural plans will also include many construction details. These are snapshots that show how each component is connected. For example, how your sill plate and floor will connect to the top of your stem wall, how the stem wall connects to your footing, etc. There are dozens of these.
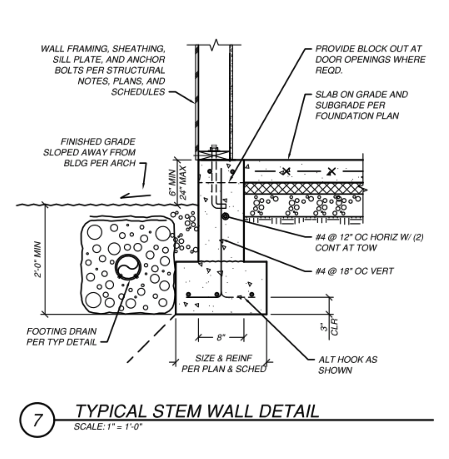 Sample typical construction detail
As you get into this process, you may hear about shear walls. These are special walls in your home that prevent your house from falling over. The technical definition is that shear walls resist lateral (horizontal) load (pressure or force). An easier way to understand this is to consider the story of The Three Little Pigs: the first two houses blew over because they didn’t have good shear walls to resist the wind load exerted on them.
Lateral load is going to be imposed on your house from wind, earthquakes, and the earth (if you have a below grade basement). Maybe there are more; I’m not an expert on this subject. But the shear wall itself is nothing fancy. It’s usually just a stick framed wall with plywood on one or both sides. Your exterior walls are almost always built like this, but interior walls will be veneered with plywood too as the shear wall schedule dictates. Part of the shear wall schedule will also specify the nail spacing. The edge of the plywood will have one spacing (e.g., a nail every 8”) and the ‘field’ (non-edges) may have another spacing (every 12”). The spacing affects the final strength of the wall, so it is important. Your building inspector will hopefully be paying attention to this too.
The structural plans mostly look similar to the architectural plans, in that they will show illustrations of the floor plan, and add annotations to capture all the necessary details. However, there are a library of (usually handwritten) documents that are behind the scenes. Every load and calculation is shown in full detail (think your math teacher saying ‘show your work’). The county wants to be able to verify the loads and sizing of all the components and needs to be able to see how the engineer did their calculations.
All of the engineers plans are ‘wet-stamped’. This is a seal that includes their credentials and their signature. Kittitas county did not accept digital versions of this, nor did they accept photocopies, so when we submitted, we had to take the prints to the engineer and have him personally stamp and sign every sheet, twice.
Truss Plans
I didn’t learn about these until after we submitted our build permit. Because of our high snow load, the county requires structural engineered roof trusses. This is an entirely separate structural engineering effort and includes a set of illustrated plans, as well as all the math that proves they will withstand the necessary load. Luckily for us, this was a free service our truss manufacturer provided (as-is common).
Preliminary site analysis
This is like a pre-building permit. This application is submitted to the county a few weeks prior to submitting the build permit. We had to include our site plan in this application too. The county performs a preliminary analysis of your property and build site. The goal is to identify anything that may prevent you from building where you want to (too close to a well, floodplain, etc), or anything that may cause complications. You’ll want to address these before submitting your build permit if you want to avoid delays (and having to resubmit).
Our site analysis came back stating that the site may require a geotechnical report, professional structural engineering would be required, and that we would need to include fire sprinklers throughout home. We were already aware of the requirements for geotechnical and structural work, but the fire sprinklers were new. I’ll elaborate on those in the Sprinkler Plans section.
Adequate Water Supply Determination
This application is submitted prior to the building permit, and a copy of the final determination is included in the permit packet. Most of the work in acquiring this was done by the prior owner. We just had to assemble the paperwork, fill out a form, and pay a nominal fee. The purpose of this determination is to prove to the county/state that size of home we are building will have access to enough water.
We are on a well, so we had to show the pump could generate enough pressure, and that the water was clean. Both of these were a call to the water management service, who ‘manages’ our well. I am not sure what they do exactly, as they have no actual control over the well, but either the county or state requires a management service for a shared well (three other lots have access to this well).
Septic Permit
Prior to submitting a building permit, you must have an approved septic permit. The previous owner had the septic system designed and approved, so we didn’t have to do anything here.
Sprinkler Plans
During our Preliminary Site Analysis, the county stated that a sprinkler system would be required for our home. We are in an extreme fire hazard area and as evidence of that, a forest fire came within a couple hundred yards of the property in 2016 (just a few months before we purchased).
We are still doing research on what goes into a sprinkler system and how to construct these plans. It’s not clear to us yet if this is something we can DIY or if we will have to get professionals involved.
I spoke with the county Fire Marshall and learned that these plans are not needed at the time of submitting the building permit application, but we must have these plans in place, and implemented, prior to the inspector signing on the framing inspection. So we are going to kick this can down the road a bit. For now, I will include a letter stating we are continuing to work on these and understand that they must be implemented prior to a framing inspection.
Energy Worksheets
Kittitas county requires home designers to complete a number of energy usage worksheets. These worksheets are maintained by Washington State University, which made the process a bit confusing as I was looking for Kittitas county’s worksheets originally. There is not a ton of documentation on how to complete these worksheets, but if you stare at them long enough, things start to make sense.
The first one is a declaration of energy ‘credits’. You specify which energy efficient approaches you will implement into your building. Based on the size (square footage) of your building, you may need more credits. Our sized home needed 3.5 credits. On this worksheet we specified things like energy efficient windows/doors, insulating under the entire basement slab (normally no insulation is used, or just the outside 2’ perimeter), using a high efficiency air-source heat pump, and a high efficiency water heater with minimal usage showerheads and faucets. All of these things combined got us the 3.5 credits we needed. If you are curious to look at the form for yourself, it is here.
The other two forms are much more technical. One has you calculate the heat load required to maintain the temperature comfort of your home. This means adding up space below/above ground, how many windows and doors you have, and specifying the insulation values of each of these. The worksheet is given as an excel file so you don’t have to do any math yourself. At the end of this you get a BTU/hr number. Ours was 93,296 BTU/hr, and so this can now be used to gauge what kind of HVAC equipment we need. That worksheet is here.
Lastly, the vertical fenestration worksheet, or glazing schedule. Fenestration is a super fancy word for doors and windows (and skylights). You list every door and window in your house, and what the ‘insulation value’ is (called u-factor) for each. A lower u-factor means the fenestration is more efficient (will block or hold heat better). The county requires a u-factor of 0.28 or better. We found an online window manufacturer that claims to provide 0.18-0.21 u-factor windows. We are going to put 0.24 on our worksheet as a buffer though. That worksheet can be found here.
Geotechnical Report
The purpose of this report is to provide data about the soil/bedrock to the county and structural engineer. This report will specify the type of soil and underlying bedrock, and how much bearing pressure it can sustain (how much weight you can reasonably place on it). Since we are on a slope, ours will dictate how much lateral pressure will be exerted onto retaining walls (our back basement wall) and this will help the structural engineer determine how strong that wall needs to be to resist the earth. The report will also mention risk of landslides and general soil stability information.
The report will include rules such as a foundation footing should not “daylight with a 1.5H:1V line”. This means that the footing must be deep enough such that if you were to draw a line that slopes 1.5’ horizontally for every 1’ vertical, that line will never see daylight (this is if you are building on a slope like we are). In our case, the report did not give specifics like “footing must be placed 6’ below grade”, but rather a number of rules like this one that would guide the construction of the foundation. This part of the planning got real interesting so stay tuned to hear a lot more about it.
So the takeaway is a building permit application is not just some architectural floor plans. They are an extremely detailed set of documents that will cover most of the entire build (missing from these are the mechanical/HVAC, plumbing, and electrical plans). It ended up taking us several months more than we planned to assemble all these documents, but by the end of it, we were much more prepared to start our build.
Next Post > > < < Previous Post