Architecting a Cabin
Tue, Apr 17, 2018Now that we’ve decided to architect the cabin ourselves, I am starting to feel the weight of that decision. Our focus with modeling it in Sketchup so far has been making sure walls connect at the right spot, doors do not open into other doors, and rooms are sized appropriately. In other words, we’ve been focused on the most basic parts of building a good home. But our expectations for this cabin are so much greater. We want it to be a functional building for a number of different scenarios; extended family Thanksgiving dinners, a hide out for a snowy weekend, or a summer vacation spot for friends and family.
General Considerations
Start to think about how rooms flow and you realize different occasions may call for different things. If two or three families are snowed-in for the weekend, they may not always want to be hanging out in one big space. You need to allow people to break off and get some alone time without feeling like they’re sequestered to a bedroom. If we’re celebrating Christmas, we don’t want half the group to feel like they need to sit in the next room because there isn’t enough space.
We have to consider all these different functional needs, but we also want it to look good! We plan to have this cabin for a lifetime (and hopefully pass it down), and the architecture needs to be lasting. We like a lot of modern elements, but those don’t always hold up over the decades.
One last general requirement is it needs to be durable. If someone wears muddy boots in the house, we don’t want that mess to become a stain. There are kids, their friends, dogs, etc. A countertop that has spilled toothpaste on it for a few days should not become ruined. We may even decide to rent the place out on occasion and don’t want to have any anxiety about having cabinets or doors scratched.
Research
Googling various phrases around cabin interiors usually just resulted in extremely fancy cabin interiors. These were fun to look at, but mostly impractical for our budget. I was trying to find guidance or best-practices for multi-family homes and how to make a space feel ‘cozy’.
I found a subreddit that focuses on cozy places, but most of these were just tiny spaces that had been organized well.
I turned to Amazon and started looking for books. Several books from Sarah Susanka were rated quite high. Reading the descriptions and some of the reviews, her books seemed right up my ally. They covered topics from layout, elevations (ceiling and floor heights), lighting, window placement, shapes, and other topics. A theme to her writing that really spoke to me was trying to do more with less space. A room did not have to be massive to give that feeling of being massive. You could inspire those feelings through various architectural decisions.
Two of her books were at the local library, and I checked out both, and proceeded to read them cover to cover. She makes heavy use of images, which made for an easy read. I will capture some of my main takeaways here…
Entryways
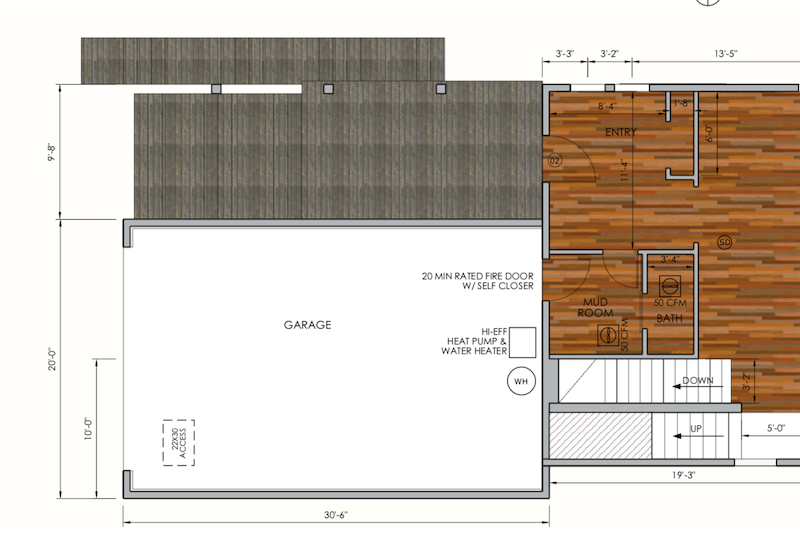
This was one topic I had already put a lot of thought into and some strong opinions on. I wanted our entryway to be its own space, and be inviting. I didn’t want the entryway to just be a door into the main room. I wanted the entryway to feel like a separate room from the house, but have a glancing view into the rest of the home.
From reading the books, I picked up a few more notes. Entryway doors do not have to be a standard size. We can have the door be wider and/or taller, and this can be the entryway feel grander or more inviting. Our door became 6 inches taller, and 6 inches wider.
Having a pathway to the entryway can make the entry feel more inviting. We are forced into having a front porch because of the way our garage is shaped, and so this will act as our pathway. Understanding that this porch would make the entryway more inviting was important to recognize and later helped influence some of the finishing cosmetic touches.
 Entryway Floor Plan
Having built-ins can make the entryway more functional. For example, a built-in bench, with a shoe storage shelf underneath. We have two windows in our entryway that would be a great place to put a bench below!
Vary the Height
Different floor heights can help define a room’s boundary without a wall. This was a handy tip because as it is currently, our main floor is one enormous room! The problem is varying the floor height would be difficult given we’d have to artificially build this into the architecture. However, Sarah Susanka had another suggestion: vary the ceiling height to achieve almost the same effect.
The ceiling over our kitchen and ‘sitting area’ was a good spot to have a lower ceiling than the rest of the main floor. We wanted these two areas to feel a bit more separate from the rest of the main floor, and having a lower ceiling in the sitting area will make it feel quieter too.
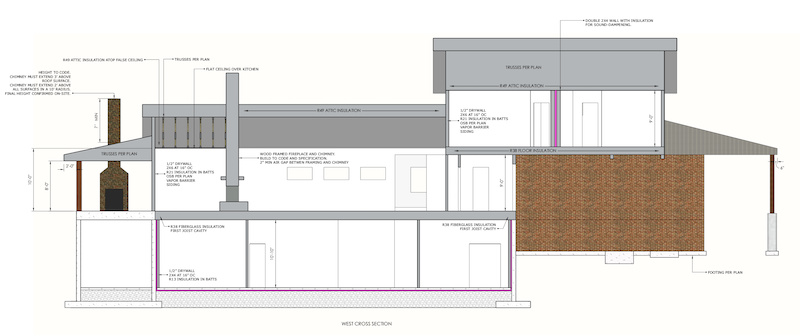 West Section View
Here you can see the sitting room off to the left end of the house, which has a lower ceiling height than the vaulted ceiling of the main room to the right of the fireplace.
Corner Windows
Placing windows on either wall at a corner can create a vanishing wall effect. The closer the windows are to the corner, the less it feels like a wall is there at all. When done correctly (with tall windows, I assume), you can make it feel like there is no barrier between the inside and outside.
This concept of blending the inside and outside really hit home with me. Before even starting this research, I knew I wanted the main room of the cabin to feel like an extension of the outside. In fact, what is outside is our main focus for the entire build: the view. We want the cabin to be unassuming with the landscape (we’re a guest here!), but when you’re in it, feel like a sanctuary from the wilderness that surrounds it. As you walk through the entryway, you feel protected from the elements, but as you enter the main room, the giant windows re-expose you to the outside once more, and remind you of where you really are.
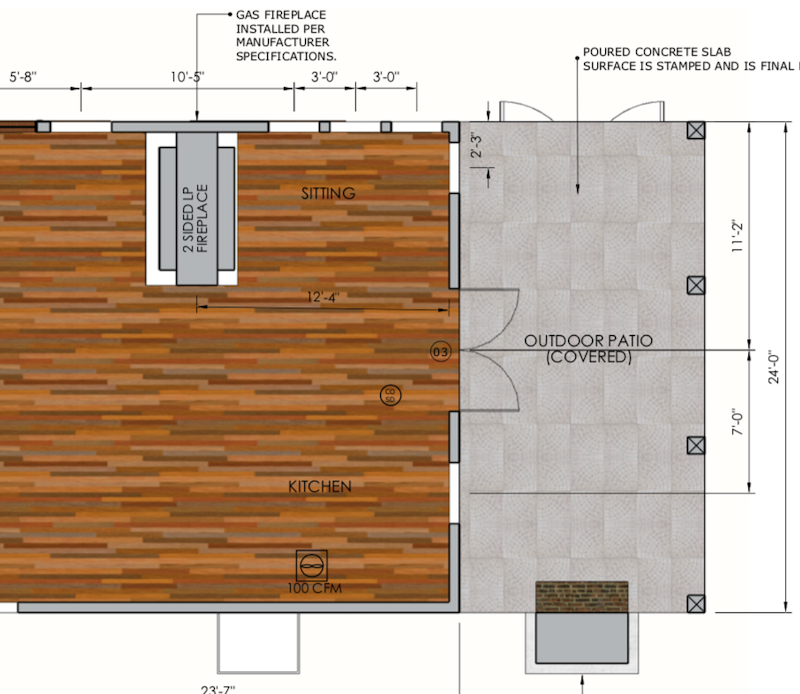
We added a corner window in the sitting area. This room will be a bit small (on purpose), and this corner window idea may have the effect of making it feel bigger. This is also a room where I feel you may be more focused on the view than anywhere else on the main floor. Only 2-3 people would comfortably fit into this room, and so there aren’t likely to be many distractions.
We also added corner windows to one of the master bedrooms.
Far Windows
You can extend a rooms perceived length by strategically placing windows. For example, if you have a hallway, or say an entryway, the line of site that looks down that hallway, or across a room, should terminate with a window. By having a window at the end, the eye continues to look beyond the wall that would otherwise be there.
We’ve incorporated this with our entryway. Directly across from the opening between the entryway and the main room are two large glass-paned french doors that open out onto the concrete deck. Similarly, we’ve placed windows at the end of the stairs going up to the masters. I am not sure this window will have the same effect, but the additional light in this corner of the house will at least brighten the stairway up a bit.
Wall Thickness
Similar to how you can vary the floor or ceiling height, you can vary the wall thickness to give rooms a different feel. The thicker the wall, the studier we perceive the structure. This falls inline with my desire to have the main room feel like a sanctuary from the elements.
The walls in the basement will be 14 inches thick, or more if we end up putting a facade. The main floor is mostly constructed of 2x6’s, so that means 6 inch thick walls, but the front wall that has all the windows will need to be constructed of 2x8’s. Before we learned this, we were going to sister a 2x4 wall in front of the 2x6 wall to make it 10 inches thick, but since the structural support needs a thicker material anyway, we don’t have to do any extra work.
As someone with an engineering background, a lot of this seemed loosely defined and, at times, excessively “artsy”. But I am glad I read everything I did. The architecture of the place feels a lot more polished to me, and I can now justify some of the choices made along the way.
Checkout out our latest plans on the plans page to see how all this was incorporated into the overall design.
Next Post > > < < Previous Post